Wednesday, 30 May 2012

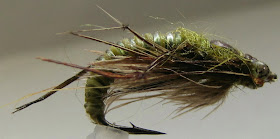
The Micro-Jelly caddis larvae.

 Size #20 Micro-Jelly caddis compare to a Canadian dime. 

Size #20 Micro-Jelly caddis larvae
  This fly pattern is called the Micro-Jelly caddis. These are some of the smaller flies that I tie for using as droppers or by it self, drifting it under an indicator. This particular fly pattern is tied on a size #20 Tiemco 2487 style hook, but could be tie on bigger or smaller hooks, it's really up to the tier and the size of hook they're comfortable with. The colours of these caddis body are all came from the thread colour that was used, Uni 8/0 in olive, rusty brown, black, chartreuse & yellow. There're also many other colour  possibility too, like red, purple, pink etc. This is a very simple fly pattern to tie, consisting of only a few tying steps and 2 or 3 materials and its done. I know that there's a lot of fly tier out there who really like simple, easy to tie, but effective fly patterns, including myself and I hope this fly pattern is one of them. I will list all the materials and tying steps below in tying order from starting the thread to whip finishing the fly.!

Materials needed for this pattern.

  • Hook- scud hook size 12 to 22 or smaller.
  • Thread- Uni 8/0 in different colours
  • Ribbing- 0.5 mm clear stretch or D-rib
  • Thorax- rabbit dubbing, peacock herl or ice dub.
  • Legs- partridge, mottle hen, mallard or any hackle fibres. (optional)


1. Place scud hook of choice in the vise and start thread behind hook eye, continue thread in touching to just    past hook bend.

2. Tie in a piece of 0.5 mm clear stretch cord about 4 or 5 inches long for easier handling, continue thread back to the thorax area in touching turns for a smother body, about 2 to 3 mm behind hook eye.

3. Start ribbing the body in touching turns, tight at first and begin to loosen up the clear stretch slowly to make a somewhat taper body, tie off clear stretch at thorax area around 2 or 3 mm behind hook eye.

4. Now is a good time to add some legs with a few hackle, partridge or mottle hen fibres.( optional)

5. Tie in 2 peacock herl to finish the thorax area or dub some rabbit dubbing or ice dub to the thread and dub the thorax. Whip finish and add a drop of head cement to complete the fly.!


Wednesday, 23 May 2012

The Emerger Caddis Pupa.

side view

top view
  This fly pattern is called the Emerger Caddis pupa. The body of this fly is made with 2 type of materials, one is a .5 mm clear stretch cord and the other is a single strand of olive bass spinner silicone skirts. The clear stretch cord was accidentally discover while I was walking around the jewellery section inside an art & craft store. The clear stretch cord is such an amazing material, small in diameter, very stretchy, transparent and easy to work with. I use a lot of it in my nymph and wet fly patterns. This is my first attempt at making a soft segmented nymph body with 2 kinds of material and it worked out really good, because when this fly gets wet I can see the thread colour underneath and the glossy effect is really cool and buggy looking. I personally believe that this fly pattern will fool the best of the smartest trout around. Even though this pattern doesn't even come close to the better looking  realistic caddis pupae versions, but I got to have confidence in the flies that I tied and think that they will produce, until proven otherwise. To the fly tier who stumble upon my blog, I wish that the things that I mention in my post will help them to improve and to tie better flies or at least discover a thing or two that they might find useful. I will list the material needed for this pattern below and I really hope that it will help who ever wants to try this fly pattern in their home waters and catch more fish because of it. Tight lines.!


The list of material needed for this nymph pattern.

  • Hook- scud or nymph size 6 to14
  • Body- .5 mm clear stretch cord & a strand of olive silicone skirt
  • Legs- knotted pheasant tail fibres
  • Thorax- olive rabbit & olive antron mix dubbing
  • Wing- Indian mottle hen feathers
  • Thorax cover- 1/8 brown scud back
  • Eyes- 2 drops of uv resin. one on each side
  • Antennae- 2 micro-fibbets  
  • Thread- Uni 8/0 or 6/0 olive

The Black Junior Tadpole.

top view

  This fly pattern is call the Black Junior Tadpole. The original idea came from experimenting with uv resin and the type of fly that can be created from this amazing new material that will harden with a zap of uv light. UV resin is not a new product and has been around for a few years now, but it's sought of new to me and in the fly tying world. This product replaces the old epoxy which were use for tying many popular patterns like spoons, minnows, fish heads, shrimps and a lot of other fly patterns as well, including this black tadpole too, of course. Enough about this uv resin stuff and lets get back to fly tying or lure making. This is a very simple fly to tie, all you need is a hook, bead chain eyes, some sought of tailing material, lead wire weights is optional and of course uv resin. I will list the tying notes below and in tying order. The kind of material use is up to the tier own preference.!


side view
1. Place the scud hook of choice in your vise and start thread behind the hook eye. Wrap a small thread base and tie in a bead chain eyes with some figure 8 wraps, about 2 mm behind hook eye.

2. Adding lead wire for weight is the perfect time to do so, if prefer. Wind the thread back to the hook bend or to the hook barb.

3. Tie in tailing material of choice, like marabou, buck tail, craft fur, synthetic streamer hair etc. The length should be 1-1/2 to 2 time the body length or longer if prefer and whip finish.


4. Finally the fun part of adding uv resin to the body, remember to add a small amount at a time and don't zap with the uv light until the shape is desirable and to your liking, because once the resin is harden there's no going back. Cote the finish fly with 1 to 2 layer of head cement, wait until dry and color it with your choice of permanent markers and the fly is complete.!                                                                                                                               


The Mud Shwimp.

upside down view

  This fly pattern is called the Mud Shwimp. I notice the spelling error and thought it would be cool to spell it that way. The majority of carp fly pattern out there are tied with the head stand style, which I think is really good to avoid snags and the fouling of the fly when fish. This fly pattern was made with softer materials like hen feathers, soft hackle and will move much better in the water column, giving life to the fly. This fly pattern is not only good for carp, but it's good for bass, bluegills and other fresh water game fish species as well. I will list all the material needed for this fly pattern and some tying notes on how to tie this fly. I'll try to explain the tying steps in order from beginning to end. I think this pattern is consider to be a medium difficulty fly, because of the the extra steps tying in the tail, body and palmering of soft hackle. Start off by inserting a hook of your choice in the vise, I used a size 6 vmc red octopus hook. Start the fl.orange thread behind the hook eye and tie in a red dumbbell eyes with some figure 8 wraps 2 to 3 mm behind the hook eye and continue thread in touching turns to just past hook bend. Tie in some soft hackle fibres for the tail and palmer a soft hen hackle feather around the tail and tie in a piece of .8 mm clear stretch cord about 5 to 6 inch long for the body, wind the thread back up behind the dumbbell eyes in touching turns. Start ribbing the body in touching turns with the clear stretch to 2/3 of hook shank and tie off. Palmer a orange badger hackle at the clear stretch tie off point and tie in 2 bunch of golden pheasant tippet (5 to 8 fibres) on each side for legs and palmer a soft hen hackle to cover the tippet tie off point. Palmer another orange badger hackle to just behind dumbbell eyes and do 2 figure 8 wraps with the badger hackle around the eyes and tie off. Add head cement and the fly is complete.!

head stand view
List of material.

  • Hook- VMC octopus size 6 triple barb
  • Tail- soft hen hackle
  • Body- fl.orange thread & .8 mm clear stretch
  • Legs- golden pheasant tippet, badger & hen hackle 
  • Eyes- red dumbbell eye         

Tuesday, 22 May 2012

The Golden Olive Crab.


Top View
Front View
Bottom View

  This is my first attempt at making a saltwater crab fly or lure and  I also try to make it as realistic as possible with what ever material that I've got in my fly tying cabinet. This crab pattern is not my original idea and there are lots of other crab pattern out there which look somewhat the same, I got the idea from looking at fly pattern photos on Google search and saw a really cool crab pattern by Dron Lee from Malaysia, He also got a blog call Fly Tying Nation which have the step by step photo instructions on how to tie his saltwater crab pattern. But this is my version of the saltwater crab fly and how it's made is kind of different from his. I will list all the material needed for tying this crab pattern below and try to simplify the all the tying instructions. This is not a hard fly pattern to tie, but will take some time on preparing the materials like the knotted goose biot for legs, cutting out the perfect crab shape shell from a piece of lint free wipes which I use for cleaning my tv & computer monitor. The size of the shell really depend on the type & size of hook you use and to adjust the size & shape accordingly. For the crab claws I just used two hen feather and remove the tips and made a knot in the middle of the feather to make it look like claw joints. After all the materials are prep and it's time to tie them on the hook. Start by tying in one side of the crab shell on to the bottom of the hook shank near the hook eye, remember which end is front and back, because the goose biot legs need to be tie in with the curve facing the rear and on top of the hook shank. The eyes are tie in next, how far out and apart is really up to the tier and depend a lot on the size of the shell and the material used for the eyes, like heavy mono thread, real shrimp or crab eyes. The claws are tie in next to the outer edge of eyes. The whiskers are tied in between the eyes, the type of material and how many hackle fibers used is up to the tier preference. After everything is tied in, turn hook over and pull the shell to the hook bend and tie off. Cote the legs, claws, shell and tie off point with some regular head cement. Add a thin layer of uv resin on top of the shell, make sure is the right shape before curing with uv light, fill in the rest of the body with uv resin and cure with uv light and one final cote of head cement. Wait until dry and color the shell and body with some specialty or sharpie permanent markers and the fly is complete.!                      
The list of material used.

  • Hook- saltwater. size 1 to 3
  • Legs- knotted goose biot.
  • Claws- knotted hen feather.
  • Eyes- shrimp or crab eyes or sub heavy mono.
  • Whisker- grizzly hackle fibres or sub antron.
  • Shell- lint free wipes, uv resins, head cement.
  • Colors- special golden olive marker & black sharpie permanent marker. 


Sunday, 6 May 2012

The Late-X-Caddis Pupae

 Late-X-Caddis Pupae.

Late-X-Caddis Pupae.
 This fly pattern is call the Late-X-Caddis pupae nymph. I got the idea of using the latex from a guy name Mikel Elexpuru. He's got a video on you-tube tying a caddis pupa using a strip of latex material for making the body. The latex he uses is better or different from what I use for my pattern. The latex strips that I got was from a pair of thin latex glove, which I found a box of 100s in the kitchen cupboard, they were use for food prep and cleaning. I thought they were quite similar, so I took a pair and cut them in to 3 to6 mm strips for my nymph body. The latex glove strips works pretty good, I got the hang of it after a few tries. When I wet the latex material it start to turn somewhat transparent and that let the olive colour thread to really shines through. Add the soft green wire ribbing and the body is done. Tie in 2 pairs of knotted pheasant tail legs and tie in a piece of 1/8 brown scud back for thorax cover and add chocolate ice dub to cover 1/2 the thorax. Remove tip from the mottle Indian hen feather and tie it in for wings and dub rest of thorax with the same chocolate ice dub. Tie in 2 micro-fibbet facing the rear end. Pull the scud back over the thorax and tie off, add a little bit of the same chocolate ice dubbing over the tie off point and pull back the scud back to cover the tie off point for eyes and whip finish. Add 2 small drops of uv resin one on each side of eyes, add a drop of uv resin on top of thorax cover and cote with some head cement and the fly is complete.!  

List of materials needed for this latex caddis pupae pattern.

  • Hook- scud or nymph  size 8 to 14
  • Body- latex glove strips & soft green wire
  • Legs- knotted pheasant tail fibres
  • Wings- Mottle Indian hen feather
  • Thorax- chocolate ice dub & 1/8 brown scud backs
  • Antennae- micro-fibbets
  • Eyes- uv resin & head cement
  • Thread- uni 8/0 olive 


Saturday, 5 May 2012

The Blood Midge Parachute.

Blood Midge Parachute.
 This is the Blood Midge Parachute dry fly pattern that I came up with after watching a video on you-tube about midge pupae emerging from the water column that make a characteristic U shape with their body before they complete the full transformation from pupae to adult. That's when I got the idea of bending the hook to make the U shape that an emerging midge does during the emerging process and it work out really well. The finish parachute dry fly looks really nice in the water column with only the middle part of the body submerge, the tail and post remain high on the water surface. This is a simple pattern, but the down side to this fly is the bending of the hook to a U shape without loosing too much of the hook gape and the smallest size possible is a #16. But other than that, it's still a very effective fly pattern in different colours, like red, brown, green, yellow, black and many other colours is possible. I will list the materials and procedure needed for this pattern at bottom of this page.!

   Tying the Blood Midge Parachute.

1- After bending of hook. Put hook in the vise and start thread behind hook eye with 8/0 black thread.
2- Tie in white antron post or sub with other post materials like deer hair, cdc, white hackle tip.
3- Continue thread to just past hook bend & tie in some white antron for tail.
4- Tie in a strand of red uni flex about 4 to 5 inch long or sub with stretch floss and bring thread back to post in touching turns.
5- Tie in grizzly saddle hackle and secure to post convex side facing yourself.
6- Start ribbing the body with the red uni flex in touching turns to post and tie down. add some black ice dub to thread and dub behind post .
7- Start turning the grizzly hackle down the post concave side facing down and tie off.
8- Add some black ice dub to thread and finish dubbing the rest of  the thorax to just behind the hook eye and whip finish. add some head cement to tie off point & add a drop of head cement to hackle under post for security. Fly Complete.!                            

Wednesday, 2 May 2012

The Tiger Damsel Nymph.

Tiger Damsel Nymph
Tiger Damsel Nymph
 The Tiger Damsel Fly Nymph is my first post for this  blog. This is a wonderful impressionistic damsel fly nymph pattern that is pretty easy to tie and the body become transparent when is wet. I will list the materials needed for this fly in a order from the head to tail. I'll try to make it as easy to understand as possible. Starting with a wet fly hook size 8, but can be made bigger or smaller is up to the tiers own preference. Secure hook in vise, using white 8/0 or 6/0 thread, tie in 2 micro-fibbet for antennae and tie in a medium mottle or regular chain bead eyes with some figure 8 wraps. Continue thread to hook bend or to barb and tin in 3 grizzly hackle tips for tails. Now tie in a single strand of 0.8 mm clear stretch cord about 4 to 5 inch long and bring thread back to thorax area in touching turns.Use a black permanent marker to make a few thin marks for a segmented body and start ribbing the body with the clear stretch cord until thorax area and tie off. Tie in a small mallard feather with the tip facing toward the tail for wing pads (concave side facing the hook shank) and pull the mallard feather back for thorax cover. Tie in 2 knotted pheasant tail legs, add some grey antron & rabbit dubbing, repeat 2 more times with shorter pheasant tail legs until reaching the chain bead eyes. Bring thread behind hook eye and pull thorax cover over and tie off. Whip finish, trim mallard wing pads to size and add a drop of uv resin on top of thorax cover, add some head cement and the fly is complete.!

Tiger Damsel Nymph
Tiger Damsel Nymph
List Of Materials.
                            

  • Hook- wet or nymph  size 6 to 12
  • Tail- grizzly hackle tip
  • Body- clear stretch, thread, black marker
  • Wing Case- mallard & uv resin
  • Thorax- grey antron & rabbit
  • Legs- knotted pheasant tail fibre
  • Eyes- mottle chain bead
  • Antennae- micro-fibbet