Tuesday, 3 July 2012

The mix nymph compilation part 2.

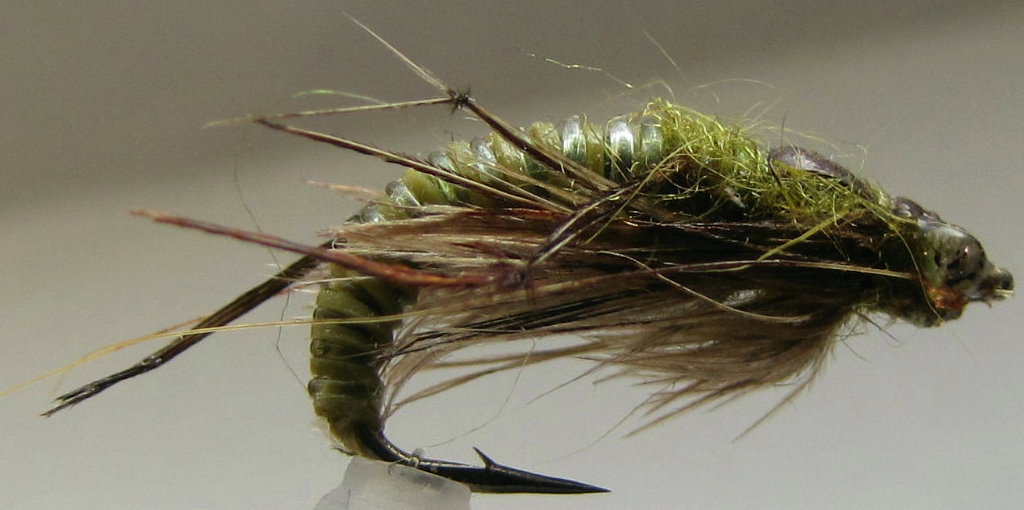
The olive damsel nymph
   
The olive damsel nymph

  • Hook- nymph size 6 to 14
  • Under body- olive thread + black sharpie
  • Body- .8 mm clear stretch
  • Tail- olive hackle tips
  • Legs- knotted pheasant tail fibres
  • Thorax- rabbit & antron dubbing
  • Eyes- small mottle chain bead
  • Wing buds & Thorax cover- olive mallard flank 
  • Thread- Uni 8/0 olive


The peacock quill buzzer
   The peacock quill buzzer
  • Hook- scud size 12 to 20
  • Body- strip peacock quill & black thread
  • Tails + breathers- white marabou
  • Wing buds- yellow synthetic fibres
  • Thorax- black biot & black thread
  • Thread- Uni 8/0 or 6/0 black
  • Head cement- 2 cotes on body & thorax


The black fly larvae
     The black fly larvae
  • Hook- scud or nymph size 14 to 20
  • Under body- light olive dubbing & olive thread
  • Body- .5 mm clear stretch
  • Head- black thread
  • Antennae- double layer knotted black thread
  • Thread- Uni 8/0 black & olive 
  • Head cement- 2 cotes on the entire fly


The mix nymph compilation part 1.

The rusty scud
   The Rusty Scud
  • Hook- scud size 8 to 18
  • Body- rusty brown ice dub
  • Shell back- 1/8 clear scud back
  • Ribbing- medium gold wire
  • Legs- light ginger hackle
  • Eyes- UV resin + black sharpie
  • Whiskers- deer hair (optional)
  • Thread- uni 8/0 or 6/0 rusty brown
  • Head cement- 2 cotes shell back
The black stone fly nymph.

  
 The black stone fly nymph
  • Hook- nymph size 8 to 14
  • Body- black + red dubbing
  • Ribbing- .5 mm clear stretch
  • Legs+Tail+Antennae- black biot
  • Wing buds- goose wing quill
  • Thorax- black & red dubbing
  • Thread- uni 8/0 or 6/0 black 


The green caddis larvae
         The green caddis larvae
  • Hook- scud size 10 to 18
  • Body- lime green dubbing
  • Ribbing- thin mono + light olive ostrich herl
  • Shell back- 1/8 clear scud back  
  • Thorax- rusty brown ice dub + UV resin 
  • Legs- pheasant tail fibres
  • Black sharpie- eyes & thorax segments 
  • Head cement- 2 cotes on shell back


Tuesday, 26 June 2012

The strung saddle streamer patterns.

A pair of clown shoes.

Mr.Badger
   Here are some of the strung saddle hackle streamer patterns that I tied back when I was just starting to learn about fly tying. I call one of them the Clown shoes and the other Mr.Badger. The original idea came from an article inside the 2009 autumn issue of Fly Tyer magazines by Ward Bean called the Beaner's Baitfish. The Beaner's baitfish patterns uses soft hen hackle & marabou, although my version looks very similar, it's made with regular strung saddle hackle. There are a few reasons why I choose strung saddle hackle instead of hen hackle, first it's readily available at any fly shops with a wide range of colour selections and a regular package of strung saddle hackle cost only about $2 to $3 dollars Cdn, but the main reason is because it's the only materials that I've got a lot of at the time. I was really happy with the final result of the finished fly. The red & yellow clown colour turn out to look pretty good as a streamer pattern. This kind of fly pattern is excellent for beginners, because it's simple and it's a good way to practise one of the basic, but very useful skill in fly tying, which is the palmering of hackles and the most important thing is to get the hands use to the idea of handling soft & fragile materials. The other technique that I learnt to use on this pattern is call a dubbing loop, it's where I put cross cut rabbit hair in between a thread loop & begin to twist the loop in a single direction with a tool that was made for spinning the dubbing loop, turning the zonker strips into a very soft rabbit hair hackle and a lot of other materials can be use in a similar way, like deer hair, cdc, marabou, mallard and etc. This is where the experimenting of different materials and the fly tiers own creativeness & personal preferences comes into play. This is why fly tying is consider to be an art by so many fly tiers & fly anglers.! I will list the materials for this fly pattern below for anyone who would like to try it out.***  
The baby green sea perch.
      

   Materials list.

  • Hook- streamer or aberdeen size 4 to 10
  • Body- strung saddle sub zonker strips, hen hackle, mallard
  • Tail- strung saddle sub mallard, hen hackle, 
  • Eyes- dumbbell, chain bead 
  • Flash- pearl, silver, gold (optional)
  • Weight- lead wire (optional)
  • Thread- uni 6/0 black or match fly colour 

The clown shoes


Friday, 22 June 2012

My Pheasant Tail Nymph Variation.


Pheasant tail mayfly nymph.

   This is my version of the famous fly pattern call the Pheasant Tail nymph. It looks kind of different from the original version tied by Frank Sawyer MBE back in the 1950's. His way of tying the pheasant tail nymph was to use only the centre cock pheasant tail fibres and dark copper wires. My version of the pheasant tail mayfly nymph is a bit more complicated to tie because of the extra materials added to the head area of the nymph, like eyes, legs, antennae and a transparent air bubble on top of the thorax. All the extra details made this nymph more realistic and should be enough to fool any wild trout into taking the fly. Although some may argue that my version is not a true pheasant tail nymph because of the extra materials, But I think that a true fly tier should be able to create new fly patterns from the old versions. This is just my interpretation of the pheasant tail nymph pattern and there is lots of variations to the pheasant tail nymph tied by many different fly tiers & fly anglers around the world. I will list the materials for my version below for any one who would like to try it out and tight lines.!
Pheasant tail mayfly nymph


  • Hook- nymph or wet size 10 to 18
  • Body + Tail + Legs- pheasant tail fibres
  • Rib- fine gold wire
  • Thorax- brown dubbing & chocolate ice dub 
  • Eyes- black chain bead or mottle 
  • Antennae- micro fibbets
  • Thorax cover- pheasant tail fibres & UV resin
  • Thread- uni 8/0 brown or black
  • Head cement- thorax cover & whip finished area.


Monday, 18 June 2012

The Ring a Ding.

The Ring a Ding
Ring a Ding

   The name of this fly pattern is called Ring a Ding and this is one of my own creative nymph pattern that I came up with while brain storming for new fly tying ideas. The fly in the photo is the result of mixing 2 very different fly patterns together, one is the famous soft hackle Spider wet fly and the other one is consider to be one of the most popular nymph pattern called the Copper John. In my opinion, I think that it is a good idea to have a fishing fly that looks like many different type of insects in the water column and the chances of catching fish with that one single pattern should be much more higher than a pattern that represent only one type of insect. It's possible that someone else might have tied this kind of fly pattern long before I did, but I haven't seen any thing like it in fly tying magazines and many of the other popular fly tying websites & forums. As a fly tier I like to experiment with lots of different tying ideas and materials, sometimes the fly will turn out to be a disaster and sometimes the fly will turn out to be something very special and unique. One of the most important thing about fly tying is to have fun and enjoy what you do as an fly tying artist or as an extension to the fly fishing sport. When I start catching fish with the flies I tied, I get the feeling of accomplishment, because my fly patterns fool the fish in to taking the fly.!


  • Hook- nymph or wet size 10 to 16 Mustad 3906B
  • Tail- yellow goose biot (sub colour of choice )
  • Body- medium gold wire (sub colour of choice)
  • Thorax- Yellow ice dub (sub colour of choice)
  • Hackle- partridge, mallard, starling, mottle hen
  • Head- black peacock ice dub
  • Thread- uni 8/0 or 6/0 yellow (sub colour of choice)
  • Add head cement to whip finished area.  


Thursday, 14 June 2012

The Foam June Beetle Bug.!

June beetle side view

June beetle bottom view
   This fly pattern is called the Foam June Beetle Bug. It is inspired by a balcony full of June bugs flying around going about their business. I have no idea why they swarm around my balcony, But I've caught a few of them in a glass jar, so I can see what they really look like up close. These June beetle bug have a hard & fat chunky abdomen that's a bit bigger then their elytra, the exoskeleton or hard shell that protect their wings & body. Their body colour is sort of beige or light to dark brown, they have a hairy thorax and clumsy legs with sharp hook like claws for clinging on to things. This is my first attempt at tying a June beetle pattern, but I've seen it done before on you-tube & some fly tying magazines, so I got a pretty good idea on how to tie one. This beetle was tied on a standard size 14 mustad #94840 hook. All the legs were made a head of time with mono like plastic stand, doubling up and tying knots into them. For the shell or over body I used a 1 or 2 mm beige foam. The abdomen is made with mix dubbing, black on the inside and grey + beige on the outside layer. The thorax is grey and rusty brown dubbing and I also lightly dub the 2 body segmented joints. The eyes were made with a small piece of 15 lbs mono line lightly burn on both ends and UV resin was added later on to make the eyes a tiny bit bigger. The antennae is micro fibbets and the thread used was a uni 8/0 rusty brown. A bit of colouring was done with different colour permanent markers, rusty brown to the top side of the beetle, dark brown & black to the legs & joints. I dotted the eyes and antennae with a black sharpie. Add a little bit of head cement to the whip finished area and the fly is complete.!

June beetle top view

    The material list.

  • Hook- dry size 8 to 16 Mustad #94840 or #94831
  • Shell- 1 or 2 mm. foam
  • Abdomen- mix colour dubbing
  • Legs- knotted plastic strands
  • eyes- heavy mono fishing line & UV resin (optional)
  • Antennae- micro-fibbets
  • Thread- Uni 8/0 rusty brown 
  • Head cement
  • Permanent markers- black, rusty brown, dark brown (optional)


Wednesday, 13 June 2012

Fan Wings Dry Fly.

Fan Wing Dry Flies


  The fan wing dry fly is simply one of the prettiest looking fly pattern. The first fan wing was fished and discovered around the early 1900's. I think the fan wing was a variation of the original royal coachman and is tied with lemon wood duck breast feather as wings on a royal coachman
Fan Wing March Brown
dry fly. The feather I used for wings on these patterns are dyed mallard feather, they're easier to find and less expensive and they should work just as good, if not better. I learn how to tie this fly from Davie Mcphail's channel on you-tube, the pattern he tied was called a fan wing Adams. He used a peacock quill for ribbing the body and I used a medium oval gold tinsel for ribbing the body of a march brown dry fly, it's more flashy but a bit heavier. I also try something that I haven't seen any body done before. It's called a fan wing humpy, everything is the same except the body is made to look like a humpy pattern with a deer hair tail & deer hair covering a dub body. The extra deer hair should add a bit more floating ability to the fly. I also try mixing different materials for the tails, like hackle & pheasant, lemon duck & hackle, deer hair & mallard etc. This pattern is pretty simple to tie once you get the wings ready by matching up a pair of mallard feather tips together convex side to convex side and adding a tail, dub the body, wrap the hackles and the fly is complete.!                                                                                                          
                                                                                     
 
The Materials needed for these patterns.                    

The Fan Wing Beetle Humpy 
The Fan Wing Yellow Mayfly

  • Hook- dry  size 10 to 16 Mustad #94831
  • Wings- dyed mallard feather tips
  • Tail- hackle fibres, pheasant tail, deer hair 
  • Body- dry fly dubbing, muskrat, antron
  • Over body- deer hair ( humpy )
  • Rib- peacock herl, oval gold tinsel 
  • Hackle- neck or saddle (web free hackle)
  • Thread- uni 8/0 matching colours
  • Head cement- wing base & the whip finish area


Sunday, 10 June 2012

The Baby Tube Fries

Baby Tube Fries


White & Blue
  These are some tube flies I tied awhile ago and they are called Tube Fries. Tied on large 1/8" OD HMH tubes that are cut to the size of 1/2 inch or less and the finished tube fly is consider kind of small by my standard. The average length of the completed tube flies is about 1-1/2 to 2 inches long. The colour combinations are endless and depends on what material the tier have on hand and the style of patterns they desire. I used fox tail & synthetics fibres for tails, but many other materials can be use, like marabou, craft fur, long mallard feather fibres, pheasant tail, buck tail, Icelandic sheep and the list goes on. The body is made with palmering schlappen or large soft hackles. The eyes that were added later on was a great idea, because it looks a lot better with eyes then without, the eye colours is also another tiers personal choices. When I started tying this fly, I have no idea what fish species these tube fries are good for and I haven't had a chance to try them out just yet, but I have confidence that some fish will take this bait. For the person who stumble upon this blog, maybe they can tie up some of these tube fries and try them in their local water and see if it'll work for them or not. All the materials used was mention above, but I will list them again in detail below for who ever is interested in trying it out.!
Black & Olive


          The list of material used.

  • HMH tubes size large 1/8" OD Or small 3/32" OD
  • Tail- Fox tail & Synthetic fibres
  • Body- Schlappen or Soft hackles
  • Eyes- Regular sticky eye, Crazy glue & UV resin
  • Thread- Uni 8/0 or 6/0 matching colours
  • Cote eyes and head with 1 to 2 layers head cement.
  • Remember to leave some room for the extension hook tubes.
Red & Orchid (purple+pink)


Saturday, 2 June 2012

The Corn-Fed E.T Hopper.

Side view

Bottom view
   This fly pattern is called the Corn-Fed E.T Hopper. The reason I call it E.T is because of the black & glossy alien like eyes, they were made with UV resin & black sharpie, it reflect a lot of lights and it's very buggy looking. A lot of different grass hoppers have similar type of glossy eyes in different colours. This was my second attempt at tying a hopper type of pattern using my own tying technique of using deer hair as an under body material. I think that the deer hair not only looks good, but will float much better together with foam. Even when the fly is completely soak, it will only sink just below the water surface. I think adding natural material to a fly pattern can give it a more neutral and realistic feel to it and should be more appealing to the fish as well. Adding legs to a top water fly pattern is really deadly and will probably fool most if not all of the smartest fish. With the silhouette of legs on the water surface and a few twitches should and will trigger a striking response, don't matter if its bass, panfish or any type of fish that pluck insects from the water surface, especially trout which consume a large amount of insects in their diet. I always try to add legs to my fly pattern as much as I could, especially to nymphs and even some dry flies too if possible, because all insects have legs, well except for worms, maggots, beetle grubs and similar type of patterns. The materials I used for this fly pattern will be listed below and hope it will help any fly tier who wants to have a go at this fly pattern. This Bloody Prince hopper pattern was tied in a similar way, but different colour materials were used.!

The Bloody Prince Hopper.
Material List.
  • Hook- Dry Size 6 to 10  Mustad #94831
  • Under Body- Deer Hair
  • Body- 2 mm Regular Fly Foam
  • Legs- Knotted Pheasant Tail Fibres
  • Thorax- Antron or Ice Dub & Grizzly Hackle
  • Wing- Deer Hair
  • Eyes- UV Resin & Black Permanent Marker                                                                                        
  • Head- 2 mm Regular Fly Foam                            
  • Thread- 8/0 or 6/0 Match Pattern Colour  

The Extended Body Mayfly Nymph.(Hatchmaster).

right side view

left side view
  This fly pattern is call the Hatch-Master Mayfly Nymph, because of the one mallard feather construction. I got the idea from watching mayfly nymph videos on you-tube and wanted to create an extended body mayfly nymph that's different. I notice a lot of mayfly nymphs in the water constantly lift up their abdomen and especially when they get wash down stream by strong current and get toss upside down, I think that is when they are at their most vulnerable to predations by trout and other fish waiting for insects drifting down stream. Remember that this is not your traditional nymph pattern and will take some time in preparing the mallard feather for tying. This is a pretty easy fly to tie once you get the mallard feather ready and the rest is just adding weight, dubbing, UV resin (optional), but is on the pattern in the photo. Adding UV resin help with the colouring of the body or make different type of markings and segmented details on the abdomen with permanent markers. I will list the tying notes below for any one who wish to try this fly pattern and hope that it will work for you as it did for me.!

          Tying notes.
  • Preparing the mallard feather, remove the tips of the feather and align 3 fibres on each side for tails, a total of 6 fibres, use a bit of head cement to help with separating the tail fibres, 2 fibre for each tail. 
  • Put a extra short hook in the vise, add 3 or 4 turns of lead wire about 1 mm behind the hook eye and start thread, put only a few thread wraps on lead wire for security and continue to hook bend or barb.
  • Tie in the mallard feather, pull all the fibres forward on the feather toward hook eye, except the tail and tie in feather with some tight thread wraps by the hook bend. Than pull all fibres back and tie down on same spot as the first tie in point.
  • Add dubbing to thorax area and cover lead wire. Pull all mallard fibres forward to make the thorax cover and tie off with a few tight thread wrap, Now split the remaining mallard feather in equal half and push fibres backward and tie off. Whip finish and add a drop of head cement, the fly is complete.!

Wednesday, 30 May 2012

The Micro-Jelly caddis larvae.

 Size #20 Micro-Jelly caddis compare to a Canadian dime. 

Size #20 Micro-Jelly caddis larvae
  This fly pattern is called the Micro-Jelly caddis. These are some of the smaller flies that I tie for using as droppers or by it self, drifting it under an indicator. This particular fly pattern is tied on a size #20 Tiemco 2487 style hook, but could be tie on bigger or smaller hooks, it's really up to the tier and the size of hook they're comfortable with. The colours of these caddis body are all came from the thread colour that was used, Uni 8/0 in olive, rusty brown, black, chartreuse & yellow. There're also many other colour  possibility too, like red, purple, pink etc. This is a very simple fly pattern to tie, consisting of only a few tying steps and 2 or 3 materials and its done. I know that there's a lot of fly tier out there who really like simple, easy to tie, but effective fly patterns, including myself and I hope this fly pattern is one of them. I will list all the materials and tying steps below in tying order from starting the thread to whip finishing the fly.!

Materials needed for this pattern.

  • Hook- scud hook size 12 to 22 or smaller.
  • Thread- Uni 8/0 in different colours
  • Ribbing- 0.5 mm clear stretch or D-rib
  • Thorax- rabbit dubbing, peacock herl or ice dub.
  • Legs- partridge, mottle hen, mallard or any hackle fibres. (optional)


1. Place scud hook of choice in the vise and start thread behind hook eye, continue thread in touching to just    past hook bend.

2. Tie in a piece of 0.5 mm clear stretch cord about 4 or 5 inches long for easier handling, continue thread back to the thorax area in touching turns for a smother body, about 2 to 3 mm behind hook eye.

3. Start ribbing the body in touching turns, tight at first and begin to loosen up the clear stretch slowly to make a somewhat taper body, tie off clear stretch at thorax area around 2 or 3 mm behind hook eye.

4. Now is a good time to add some legs with a few hackle, partridge or mottle hen fibres.( optional)

5. Tie in 2 peacock herl to finish the thorax area or dub some rabbit dubbing or ice dub to the thread and dub the thorax. Whip finish and add a drop of head cement to complete the fly.!


Wednesday, 23 May 2012

The Emerger Caddis Pupa.

side view

top view
  This fly pattern is called the Emerger Caddis pupa. The body of this fly is made with 2 type of materials, one is a .5 mm clear stretch cord and the other is a single strand of olive bass spinner silicone skirts. The clear stretch cord was accidentally discover while I was walking around the jewellery section inside an art & craft store. The clear stretch cord is such an amazing material, small in diameter, very stretchy, transparent and easy to work with. I use a lot of it in my nymph and wet fly patterns. This is my first attempt at making a soft segmented nymph body with 2 kinds of material and it worked out really good, because when this fly gets wet I can see the thread colour underneath and the glossy effect is really cool and buggy looking. I personally believe that this fly pattern will fool the best of the smartest trout around. Even though this pattern doesn't even come close to the better looking  realistic caddis pupae versions, but I got to have confidence in the flies that I tied and think that they will produce, until proven otherwise. To the fly tier who stumble upon my blog, I wish that the things that I mention in my post will help them to improve and to tie better flies or at least discover a thing or two that they might find useful. I will list the material needed for this pattern below and I really hope that it will help who ever wants to try this fly pattern in their home waters and catch more fish because of it. Tight lines.!


The list of material needed for this nymph pattern.

  • Hook- scud or nymph size 6 to14
  • Body- .5 mm clear stretch cord & a strand of olive silicone skirt
  • Legs- knotted pheasant tail fibres
  • Thorax- olive rabbit & olive antron mix dubbing
  • Wing- Indian mottle hen feathers
  • Thorax cover- 1/8 brown scud back
  • Eyes- 2 drops of uv resin. one on each side
  • Antennae- 2 micro-fibbets  
  • Thread- Uni 8/0 or 6/0 olive

The Black Junior Tadpole.

top view

  This fly pattern is call the Black Junior Tadpole. The original idea came from experimenting with uv resin and the type of fly that can be created from this amazing new material that will harden with a zap of uv light. UV resin is not a new product and has been around for a few years now, but it's sought of new to me and in the fly tying world. This product replaces the old epoxy which were use for tying many popular patterns like spoons, minnows, fish heads, shrimps and a lot of other fly patterns as well, including this black tadpole too, of course. Enough about this uv resin stuff and lets get back to fly tying or lure making. This is a very simple fly to tie, all you need is a hook, bead chain eyes, some sought of tailing material, lead wire weights is optional and of course uv resin. I will list the tying notes below and in tying order. The kind of material use is up to the tier own preference.!


side view
1. Place the scud hook of choice in your vise and start thread behind the hook eye. Wrap a small thread base and tie in a bead chain eyes with some figure 8 wraps, about 2 mm behind hook eye.

2. Adding lead wire for weight is the perfect time to do so, if prefer. Wind the thread back to the hook bend or to the hook barb.

3. Tie in tailing material of choice, like marabou, buck tail, craft fur, synthetic streamer hair etc. The length should be 1-1/2 to 2 time the body length or longer if prefer and whip finish.


4. Finally the fun part of adding uv resin to the body, remember to add a small amount at a time and don't zap with the uv light until the shape is desirable and to your liking, because once the resin is harden there's no going back. Cote the finish fly with 1 to 2 layer of head cement, wait until dry and color it with your choice of permanent markers and the fly is complete.!                                                                                                                               


The Mud Shwimp.

upside down view

  This fly pattern is called the Mud Shwimp. I notice the spelling error and thought it would be cool to spell it that way. The majority of carp fly pattern out there are tied with the head stand style, which I think is really good to avoid snags and the fouling of the fly when fish. This fly pattern was made with softer materials like hen feathers, soft hackle and will move much better in the water column, giving life to the fly. This fly pattern is not only good for carp, but it's good for bass, bluegills and other fresh water game fish species as well. I will list all the material needed for this fly pattern and some tying notes on how to tie this fly. I'll try to explain the tying steps in order from beginning to end. I think this pattern is consider to be a medium difficulty fly, because of the the extra steps tying in the tail, body and palmering of soft hackle. Start off by inserting a hook of your choice in the vise, I used a size 6 vmc red octopus hook. Start the fl.orange thread behind the hook eye and tie in a red dumbbell eyes with some figure 8 wraps 2 to 3 mm behind the hook eye and continue thread in touching turns to just past hook bend. Tie in some soft hackle fibres for the tail and palmer a soft hen hackle feather around the tail and tie in a piece of .8 mm clear stretch cord about 5 to 6 inch long for the body, wind the thread back up behind the dumbbell eyes in touching turns. Start ribbing the body in touching turns with the clear stretch to 2/3 of hook shank and tie off. Palmer a orange badger hackle at the clear stretch tie off point and tie in 2 bunch of golden pheasant tippet (5 to 8 fibres) on each side for legs and palmer a soft hen hackle to cover the tippet tie off point. Palmer another orange badger hackle to just behind dumbbell eyes and do 2 figure 8 wraps with the badger hackle around the eyes and tie off. Add head cement and the fly is complete.!

head stand view
List of material.

  • Hook- VMC octopus size 6 triple barb
  • Tail- soft hen hackle
  • Body- fl.orange thread & .8 mm clear stretch
  • Legs- golden pheasant tippet, badger & hen hackle 
  • Eyes- red dumbbell eye         

Tuesday, 22 May 2012

The Golden Olive Crab.


Top View
Front View
Bottom View

  This is my first attempt at making a saltwater crab fly or lure and  I also try to make it as realistic as possible with what ever material that I've got in my fly tying cabinet. This crab pattern is not my original idea and there are lots of other crab pattern out there which look somewhat the same, I got the idea from looking at fly pattern photos on Google search and saw a really cool crab pattern by Dron Lee from Malaysia, He also got a blog call Fly Tying Nation which have the step by step photo instructions on how to tie his saltwater crab pattern. But this is my version of the saltwater crab fly and how it's made is kind of different from his. I will list all the material needed for tying this crab pattern below and try to simplify the all the tying instructions. This is not a hard fly pattern to tie, but will take some time on preparing the materials like the knotted goose biot for legs, cutting out the perfect crab shape shell from a piece of lint free wipes which I use for cleaning my tv & computer monitor. The size of the shell really depend on the type & size of hook you use and to adjust the size & shape accordingly. For the crab claws I just used two hen feather and remove the tips and made a knot in the middle of the feather to make it look like claw joints. After all the materials are prep and it's time to tie them on the hook. Start by tying in one side of the crab shell on to the bottom of the hook shank near the hook eye, remember which end is front and back, because the goose biot legs need to be tie in with the curve facing the rear and on top of the hook shank. The eyes are tie in next, how far out and apart is really up to the tier and depend a lot on the size of the shell and the material used for the eyes, like heavy mono thread, real shrimp or crab eyes. The claws are tie in next to the outer edge of eyes. The whiskers are tied in between the eyes, the type of material and how many hackle fibers used is up to the tier preference. After everything is tied in, turn hook over and pull the shell to the hook bend and tie off. Cote the legs, claws, shell and tie off point with some regular head cement. Add a thin layer of uv resin on top of the shell, make sure is the right shape before curing with uv light, fill in the rest of the body with uv resin and cure with uv light and one final cote of head cement. Wait until dry and color the shell and body with some specialty or sharpie permanent markers and the fly is complete.!                      
The list of material used.

  • Hook- saltwater. size 1 to 3
  • Legs- knotted goose biot.
  • Claws- knotted hen feather.
  • Eyes- shrimp or crab eyes or sub heavy mono.
  • Whisker- grizzly hackle fibres or sub antron.
  • Shell- lint free wipes, uv resins, head cement.
  • Colors- special golden olive marker & black sharpie permanent marker. 


Sunday, 6 May 2012

The Late-X-Caddis Pupae

 Late-X-Caddis Pupae.

Late-X-Caddis Pupae.
 This fly pattern is call the Late-X-Caddis pupae nymph. I got the idea of using the latex from a guy name Mikel Elexpuru. He's got a video on you-tube tying a caddis pupa using a strip of latex material for making the body. The latex he uses is better or different from what I use for my pattern. The latex strips that I got was from a pair of thin latex glove, which I found a box of 100s in the kitchen cupboard, they were use for food prep and cleaning. I thought they were quite similar, so I took a pair and cut them in to 3 to6 mm strips for my nymph body. The latex glove strips works pretty good, I got the hang of it after a few tries. When I wet the latex material it start to turn somewhat transparent and that let the olive colour thread to really shines through. Add the soft green wire ribbing and the body is done. Tie in 2 pairs of knotted pheasant tail legs and tie in a piece of 1/8 brown scud back for thorax cover and add chocolate ice dub to cover 1/2 the thorax. Remove tip from the mottle Indian hen feather and tie it in for wings and dub rest of thorax with the same chocolate ice dub. Tie in 2 micro-fibbet facing the rear end. Pull the scud back over the thorax and tie off, add a little bit of the same chocolate ice dubbing over the tie off point and pull back the scud back to cover the tie off point for eyes and whip finish. Add 2 small drops of uv resin one on each side of eyes, add a drop of uv resin on top of thorax cover and cote with some head cement and the fly is complete.!  

List of materials needed for this latex caddis pupae pattern.

  • Hook- scud or nymph  size 8 to 14
  • Body- latex glove strips & soft green wire
  • Legs- knotted pheasant tail fibres
  • Wings- Mottle Indian hen feather
  • Thorax- chocolate ice dub & 1/8 brown scud backs
  • Antennae- micro-fibbets
  • Eyes- uv resin & head cement
  • Thread- uni 8/0 olive 


Saturday, 5 May 2012

The Blood Midge Parachute.

Blood Midge Parachute.
 This is the Blood Midge Parachute dry fly pattern that I came up with after watching a video on you-tube about midge pupae emerging from the water column that make a characteristic U shape with their body before they complete the full transformation from pupae to adult. That's when I got the idea of bending the hook to make the U shape that an emerging midge does during the emerging process and it work out really well. The finish parachute dry fly looks really nice in the water column with only the middle part of the body submerge, the tail and post remain high on the water surface. This is a simple pattern, but the down side to this fly is the bending of the hook to a U shape without loosing too much of the hook gape and the smallest size possible is a #16. But other than that, it's still a very effective fly pattern in different colours, like red, brown, green, yellow, black and many other colours is possible. I will list the materials and procedure needed for this pattern at bottom of this page.!

   Tying the Blood Midge Parachute.

1- After bending of hook. Put hook in the vise and start thread behind hook eye with 8/0 black thread.
2- Tie in white antron post or sub with other post materials like deer hair, cdc, white hackle tip.
3- Continue thread to just past hook bend & tie in some white antron for tail.
4- Tie in a strand of red uni flex about 4 to 5 inch long or sub with stretch floss and bring thread back to post in touching turns.
5- Tie in grizzly saddle hackle and secure to post convex side facing yourself.
6- Start ribbing the body with the red uni flex in touching turns to post and tie down. add some black ice dub to thread and dub behind post .
7- Start turning the grizzly hackle down the post concave side facing down and tie off.
8- Add some black ice dub to thread and finish dubbing the rest of  the thorax to just behind the hook eye and whip finish. add some head cement to tie off point & add a drop of head cement to hackle under post for security. Fly Complete.!                            

Wednesday, 2 May 2012

The Tiger Damsel Nymph.

Tiger Damsel Nymph
Tiger Damsel Nymph
 The Tiger Damsel Fly Nymph is my first post for this  blog. This is a wonderful impressionistic damsel fly nymph pattern that is pretty easy to tie and the body become transparent when is wet. I will list the materials needed for this fly in a order from the head to tail. I'll try to make it as easy to understand as possible. Starting with a wet fly hook size 8, but can be made bigger or smaller is up to the tiers own preference. Secure hook in vise, using white 8/0 or 6/0 thread, tie in 2 micro-fibbet for antennae and tie in a medium mottle or regular chain bead eyes with some figure 8 wraps. Continue thread to hook bend or to barb and tin in 3 grizzly hackle tips for tails. Now tie in a single strand of 0.8 mm clear stretch cord about 4 to 5 inch long and bring thread back to thorax area in touching turns.Use a black permanent marker to make a few thin marks for a segmented body and start ribbing the body with the clear stretch cord until thorax area and tie off. Tie in a small mallard feather with the tip facing toward the tail for wing pads (concave side facing the hook shank) and pull the mallard feather back for thorax cover. Tie in 2 knotted pheasant tail legs, add some grey antron & rabbit dubbing, repeat 2 more times with shorter pheasant tail legs until reaching the chain bead eyes. Bring thread behind hook eye and pull thorax cover over and tie off. Whip finish, trim mallard wing pads to size and add a drop of uv resin on top of thorax cover, add some head cement and the fly is complete.!

Tiger Damsel Nymph
Tiger Damsel Nymph
List Of Materials.
                            

  • Hook- wet or nymph  size 6 to 12
  • Tail- grizzly hackle tip
  • Body- clear stretch, thread, black marker
  • Wing Case- mallard & uv resin
  • Thorax- grey antron & rabbit
  • Legs- knotted pheasant tail fibre
  • Eyes- mottle chain bead
  • Antennae- micro-fibbet