Sunday 17 February 2013

The Flex-Tail Minnows.

Flex-Tail Minnows. ( Wet ).

   This is one of my recent fly creation and is call the Flex-Tail Minnows. I notice a lot of bait fish patterns out there doesn't have any tails and a minnow isn't a minnow without a tail, it just doesn't seem to look right to me. So I came up with an idea to make a simple fish tail with goose biots & some flash materials. I'm pretty happy with the result of this new bait fish patterns and I can't wait until the season open to try it out. I've posted the tying steps below for all you bait fish patterns lover out there.!


Tying Step #1.
 Step #1. Get 2 goose biot fibres and hold them with your index finger & thumb. Have the biot in a x position, 1 biot should be a bit longer than the other and make a few thread wraps with the bobbin and whip finish.


Tying Steps #2

 Step #2. Wrap the flash material between the biot and make a few tight thread wraps & whip finish. Cut off any extra flash material on the tag end.
( Flash material can be sub with stretch floss )
Step #1 and #2

 It should look like this and the flex tail is ready to be tie on to a hook. Cote a layer of head cement to the tie off area just for the sake of durability.
Tying Step #3
 Step #3. Tie tail to hook. Length of the tail is determine by the type of hackle you use. But can be sub with dye mallard, Hen, Schlappen or marabou etc.
Tying Steps #4.

 Steps #4. Tie in a small bunch of fox tail fibres. Extra flash can be added. Once again materials can be sub with others.


Tying Steps #5.
Tying steps #5. Tie in the back end of a large schlappen feathers and start to palmer feather up the hook shank & whip finish. Make sure the feather fibres doesn't extend past the tail. More than 1 feather can be used, as long as the hook shank is cover. Remember to leave some room near the hook eye for adding fish eyes later on.


Tying Steps #6


   Tying steps #6. Stick on 2 holographic fish eyes and cover top & bottom with some UV resin, cote eyes with a layer of head cement. The Flex Tail Minnows is complete.!


Flex-Tail Minnows. ( Wet ).

When this bait fish patterns get wet, the flash really shine through.
Flex-Tail Grey.

Flex-Tail White.

Wednesday 30 January 2013

Fly Patterns For 2013.

Brown Mayfly Nymph 1.

Brown Mayfly Nymph 2.
  This is one of the new mayfly nymph pattern that I tied for the up coming trout season in 2013 and is called " The River Hobo ". I hope the name doesn't offend anybody. It's a regular nymph pattern that has been modified to represent a mayfly larvae in the process of  emerging. That's the reason for the extra bulk on top of the thorax, Its suppose to represent the gas cuticle in a mayfly larvae that increases its buoyancy in the water & float to the surface film. But some fly tiers may think it's not necessary to add these extras parts to a fly pattern, because some of the regular old patterns still catches fish, example like the hares ear, prince nymph, pheasant tail etc. Don't get me wrong, they're are all great patterns. But as a fly tier I always want to try out new flies, even if the famous patterns still works. Because we never know when those trout decides to be picky and selective about their foods, it's good to know that you have a few odd patterns in your fly box that they've never seen before and it might even turn a otherwise slow fishing day on the river into a fishing day to remember. I'll list the tying steps below for anyone who's interested in trying it out.!


The River Hobo Nymph.

Step 1- The hook I used is a long curved "Mustad C53S". Start thread behind hook eye.(black or brown thread). Tie in 2 micro-fibbets for antennae and tie in a burnt mono eyes 2 or 3 mm behind hook eye. Bring tying thread back to hook point.

Step 2- Tie in 3 micro-fibbets for tails & use figure 8 wraps to spread them and tie in the ribbing material just  a little in front of the tail tie off point.

Step 3- Start to dub a taper body with some rabbit dubbing to about 3 quarter of the hook shank. Start ribbing the body and tie off ribbing where body dubbing ends.

Step 4- Used some dubbing to cover the ribbing tie off area and tie in 2 goose biot for wings (concave side facing up). Tie in scud back material above the biot tie in point and cover tie off area with a darker colour rabbit dubbing.

Step 5- Tie in soft hackle fibres for legs on each side & cover tie off area with rabbit dubbing. Repeat 2 more times, using shorter hackle fibres than the one before.

Step 6- Lightly dub tying thread & figure 8 wraps around the eyes and pull the scud-back over the thorax area and right behind hook eye and tie off.

Step 7- Add UV resin on top of scud-back and cote with a layer of head cement.

Step 8- Is optional. Colouring the Thorax UV resin, Tails & Antennae with permanent markers.

" I really hope this nymph pattern will catch you the big one "  Thanks.!  


Thursday 13 December 2012

Parachutes Dry Flies.

The Mellow Yellow.
The V-Wing Parachute.
    The parachute style of dry flies is one of my  favourite fly patterns.1- Because it's easy to tie and 2- It works on almost any type of fish species that prey on insects in the rivers, like Trout, White fish, Pan fish and many others. 3- The best part is that it float very well & sit nice and flat on the water surface. I will upload a few of the parachute patterns that I tied up recently like this Mellow Yellow, Using a yellow Peacock quill for the body & a type of yellow flash for the hackle post, died yellow grizzly neck hackle and a wood duck tail.. The next fly is one of my new fly pattern that I created by mixing a Klink-Hammer & a Evil-Weevil together and I call it the V-Wing Parachute. The tying steps is pretty simple.

Hook- scud or egg hook size #10 to #18
Body- mixed yellow ice dub & antron
Rib- small black mylar
Wings- natural goose biot
Legs- hen or soft hackle fibres
Hackle Post- mixed black & yellow flash
Hackle- yellow grizzly neck
Thorax- black peacock ice dub
Thread- black & yellow 8/0
The Blood-Midge Emerger 2.


  I also did a blood midge and a regular midge emerger using the same method, but on a different hook and body materials I posted the photo below  for any who is interested in trying it out.!

Hook- dry size #12 to #16 (bending is optional)
Body- .5 mm clear stretch (red perm marker)
Underbody- red 6/0 or 8/0 thread
Tail- antron & red flash
Wings- white goose biot
Hackle Post- red flash material
Hackle- grizzly saddle
Thorax- rusty brown ice dub (black perm marker)


The Midge-Emerger.


The V-Wing Parachutes.


Friday 23 November 2012

The Ghost Moth Pattern.

The Ghost Moth Pattern.
   
     This is one of my most recent fly pattern and it's called the Ghost Moth. I got the idea from looking at  photos on Google image about a rare moth specie. Even though it might not be on the list of insects in a trouts regular diet, but it does resemble an emerging caddis or some other dull colour insects stuck on the surface film. This pattern consist of only a few materials and is pretty simple to tie. This fly sit really nice and flat on the water surface and it floats very well because of the deer hair wings and I also try a new technique tying in the hackle fibres behind the thorax and coming out from the sides, which I think will give the fly more support on the water surface and should float much better. The hackle fibres is also use later on as the thorax cover and thus eliminating the  need to use scud back or extra materials for that particular purpose. I will list all the materials for this fly pattern below for any fly tiers who wish to try it out. Remember that all the materials on this fly pattern can be replaced with other materials to create a new and different fly pattern. I really hope this fly pattern can become one of those go to fly that a fisherman can depend on when times are tough on the rivers or lakes and hope that it will catch them the big ones.   Thanks!

   The Ghost Moth materials.

Hook- Mustad C53S Long & Curved Size #10 to #16.( Sub- Scud Hook )
Wings- Natural Deer Hair. ( Sub- Hackle Fibres )
Body- Mixed Dubbing. Rabbit & Synthetics Materials.
Legs Or Tactile Setae- Long Badger Hackle Fibres. (1*)
Thorax- Rabbit & Chocolate Ice Dub.
Thorax Cover- Back Ends Of Badger Hackle Fibres. (2*)
Antennae- Micro-Fibbets.
Wing Buds Bubble- UV Resin & Coats With Head Cement. ( Bug Bond, Knot Sense, CCG )
Thread- Uni 6/0 Or 8/0 White.


New Fly Patterns.(Deer-Hackle-Biot).

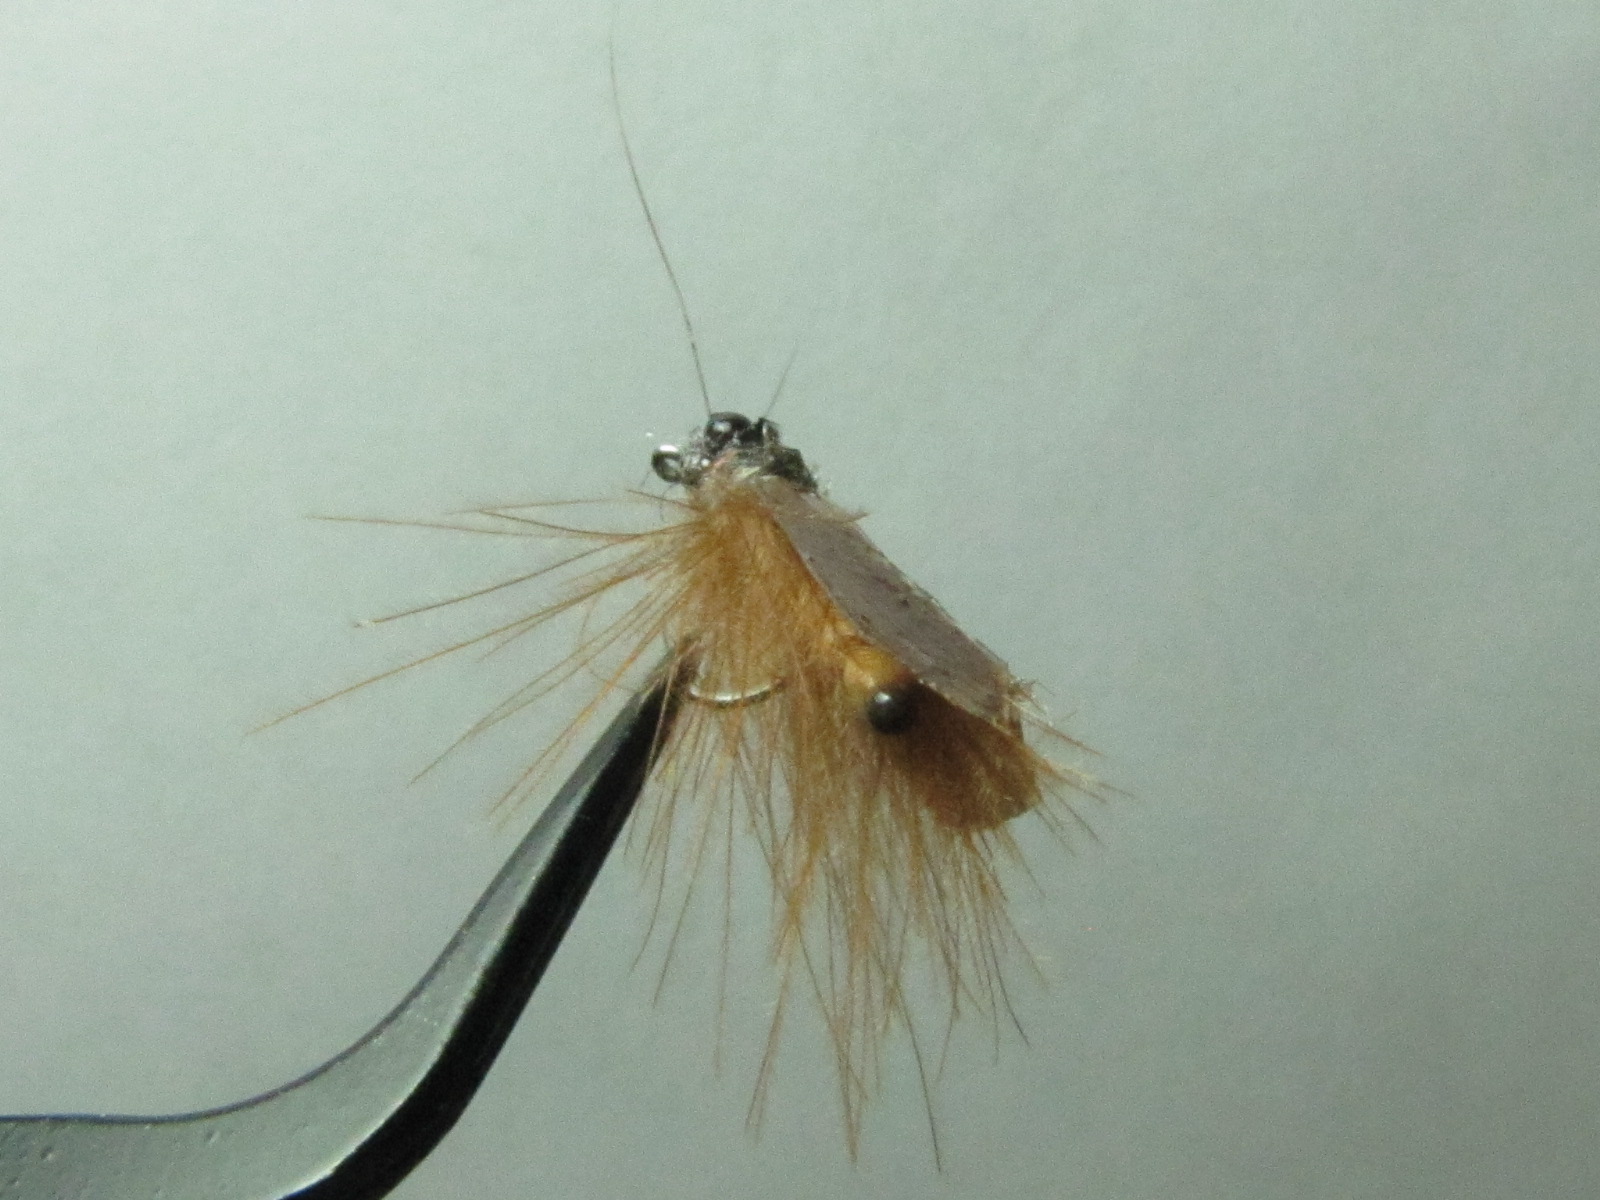
The D & F Special. ( Deer & Feather )

The H-B Special. ( Hackle & Biot )
     This fly pattern is called the Deer & Feather Special. The original idea came from looking at images of float plane sitting on the water surface and to create a fishing fly that floats in a similar way. The deer hair & hackle fibres is the perfect combination to float this style of fly. I also try tying another fly using this similar method, But using only  hackle fibres in place of deer hair and it's called the H-B Special (Hackle & Biot). The 2 fly is almost exactly the same, only the wings & body material colour is different and one with deer hair, and one without. I tested both finished fly in a tank of water without adding any fly floatant and obviously the one with the deer hair float much longer than the one without, But after adding fly floatant to the H-B Special, it perform just as well. There's also a third pattern and is called the D & B Emerger ( Deer & Biot ). Same method but tied on a scud hook, it look sort of like a caddis emerger. I really believe these new fly patterns will fool some of the trout or even other game fish into taking the fly as an easy meal. but I still haven't had the chance to try them out. I will list all the materials for these patterns below for any one who would like to try it out on their rivers or lakes and hope that it will catch them the big ones.! Thanks.

 (1). The D & F Special.
Hook- Dry Size #12 To #18
Tails- Hackle & Pheasant tail Fibres. 
Body- Rabbit Or Muskrat. ( Sub- Antron )
Wings- Hackle Tips.
Thorax- Mixed Rabbit & Chocolate ice dub.
Thorax Cover- 1.mm Fly Foam Or Scud Back. (Coats With 1 or 2 Layer of Head Cement-Optional).
Legs Or Floaters- Natural Deer Hair.( Sub- Other Colours ).
Thread- Uni 6/0 Or 8/0


  (2). The H-B Special.
Hook- Dry Size #12 To #18
Tails- Stiff Neck Furnace Hackle Fibres.
Body- Mixed Peacock Diamond Dub & Antron.
Wings- Goose Or Duck Biots.
Thorax- Mixed Peacock Diamond Dub & Rabbit.
Thorax Cover- 1.mm Fly Foam Or Scud Back. (Coats With 1 or 2 Layers of Head Cement-Optional).
Legs Or Floaters- Furnace Hackle Fibres.( Sub- Other Colours ).
Thread- Uni 6/0 Or 8/0


The D & B Emerger.( Deer & Biot )
  (3). The D & B Emerger.
Hook- Light Scud Size #12 To #18
Body- Peacock Diamond Dub.
Rib- Holo-Graphic Flash.
Wings- Goose Biot & Chartreuse Mallard.
Thorax- Yellow & Rusty Brown Ice Dub.
Thorax Cover- 1.mm Fly Foam.(coat with Head Cement-Optional).
Legs Or Floaters- Deer Hair.
Thread- Uni 6/0 Or 8/0.

Tuesday 6 November 2012

My recent fly patterns.

My RS2 Variant Pattern.

    These are some of my new fly fly patterns that I came up with recently, well maybe new to me at least. The first one is my RS2  variant pattern using white goose or duck biot as wing buds instead of antron, I think it gives the fly a more realistic appeal and a different look to a otherwise famous fly pattern. For the tail I used micro fibbets, I also wanted to use natural material, but I don't have any feathers that are long & stiff enough for the job. The body is dubbed with a personal mixture of hare mask & squirrel tail dubbing. And for the thorax cover or wing case material, I used a odd material that I found inside a power pro braid fishing line box, they're like small strip of sticky foam use for holding fishing line. But any regular fly tying foam or scud back will do the job. The tying thread is grey 8/0 & size #14 Mustad dry fly hook.!


My Deer Belly Trico Pattern.

   The second fly is my deer hair trico & it's very simple to tie, But the small hook size could be a problem sometimes. It's tied on a size #22 Mustad R30 dry fly hook. The whole fly only uses 2 or 3 materials including the tying thread, which I use for the body & the thorax area. For the tail I used micro fibbets, but many natural material can be use as well, like long neck hackle fibres, pheasant tail, moose mane etc, can also be a good substitute. And for the wings I used white deer belly hair, tied on like a compara dun style and  split apart with some figure 8 thread wraps. Many other materials like regular deer, elk, snow shoe rabbit or even synthetic materials like polypropylene are a good floating wing material as well. The last thing left to do is to build a small head, whip finish and add a drop or two of head cement and the fly is done. Pretty simple right.!


My Sow Bug Pattern. 

 
   The third fly is my foam back sow bug variant pattern. This fly is a little bit more complicated than the ones before, because of the extra materials being used, and most of them had to be tied in by the hook bend in order. The materials that had to be tied in are as follow, 1- a small thin strip of white foam. 2- a short piece of thin mono for ribbing. 3- a piece or 2 of olive ostrich herl. After they're all tied on to the hook bend, Bring tying thread back to hook eye area. The first to come up the hook is the olive ostrich herl, to about the thorax area maybe 3 or 4 mm behind the hook eye and tied in. Next up is the piece of foam, tied in same area as ostrich herl, Don't cut off the extra foam it's needed later as the wing case. The last material is the mono ribbing, do about 5 or 6 segments and tied in the same area as everything else. For the legs material I used 6 or 8 lemon duck fibres, but can be sub with mallard, partridge, mottle hen etc. Tie them in beneath the thorax area and leave a little bit of the back end sticking out toward the hook eye a bit. I dub the thorax with a mixture of muskrat and just a few strands of diamond dub peacock over the leg material. Now bend the back ends of the legs fibres and bring foam over thorax dubbing and tie off. Whip finish the fly. Use a light brown marker and lightly mottle the foam, don't color completely. Use a black marker to make 2 dots for eyes. The final thing is to make the bug glossy, put a thin layer or 2 of head cement over the foam back and the eyes, It'll bring the color and the eyes to life and the fly is complete. Don't forget to experiment and most of all Have Fun doing it.! Cheers.


Wednesday 29 August 2012

The Parachute Daddy Long Legs.

Parachute Daddy Long Legs
  Daddy Long Legs

  This is one of my most recent fly tie, I call it the Parachute Brown Sugar Daddy Long Legs. It's pretty obvious that the whole fly is brown and probably could have call it something else, but what the heck, the name sounded ok, I guess. There's not much to talk about on this particular fly pattern, just another fly tying experiment. This daddy is tied on a size 12 TMC thin wire shrimp or scud hook, with a segmented brown foam extended body. The hackle post is brown antron and the hackle is a light brown saddle hackle. The wings are hackle tips which came from the same light brown saddle cape, using the smaller or shortest feathers available. The legs are knotted pheasant tail fibres and some peacock ice dub was used for covering the base of the hackle post or thorax area. It's a pretty simple fly tie. The hardest part is probably making the foam body and the rest is pretty straight forward.!


   Materials

  • Hook- shrimp or scud size 8 to 14
  • Body- 2 mm. fly foam
  • Legs- knotted pheasant tail fibres
  • Wings- saddle hackle tips
  • Hackle post- antron post material
  • Hackle- dry fly brown saddle     
  • Thorax- peacock ice dub
  • Thread- Uni 8/0 or 6/0 


The Zoolly Worm.

The Zoolly Worm 1.

The Blood Shot Zoolly Worm.
The Bird's Nest Zoolly
  This is my version of a wet fly variant pattern that originate from the famous "Woolly Worm" and the "Zulu". Either one is correct or incorrect, Because non of the materials that make up the 2 patterns mention above were use like wool, silver tinsel, mallard etc, But the fly does looks like a cross between a couple of patterns. The reason for tying this fly pattern is because I've read some article online about a certain fishing flies that were being banned from use because they were making such a killing on the trout, ( Booby, Blob, Alexandra etc ) That the river authority has to make up rules to stop them from being used. One of the main reason mention was that the trout will swallow a certain flies very deep down their throat and that will seriously harm or kill the fish. Eventually the dead fish numbers will add up over time and will put even more pressure on the already sensitive natural trout populations. In my opinion no fishing flies should be banned. The flies made for fly fishing are meant to be small because fly tiers are replicating very small insects & crustaceans or nymphs, the probability of a fish swallowing a small fly deep in the throat has a pretty high percentage of doing so, and not to mention that the fisherman fishing skills & attitudes has to be added to the equation as well. When the fisherman are using barb-less hooks & release more of their catch and handle the fish with care, it's possible that everyone can enjoy the sport of fishing for many years to come, we all need to do our part in protecting our environment & natural resource for the future generations. OK. Lets get back to tying flies. The zoolly is a very simple fly pattern to tie and probably a lot of  fly tiers know it already, but I'll list the materials and tying steps below anyway, for anyone who would like to try it out.!


 Materials & tying steps
The Zoolly Worm

  • Hooks- wet or nymph size 10 to 18 Mustad 3906B
  • Tail- soft hackle or schlappen and marabou
  • Body- ostrich herl or dubbing (reinforce with wire or tying thread) optional
  • Hackle- grizzly bugger streamer hackles
  • Collar- ice dub or diamond dub ( brush back with velcros ) 
  • Head- tying thread & head cement
  • Thread- Uni 8/0 or 6/0


1- Put hook of choice in vise & start thread right behind hook eye, continue thread in touching turns to the barb or just before the bend. (leave a long thread tag if decide to use thread as a binding wire) Optional.

2- Tie on some soft hackle fibres just shy of hook shank length & tie on some marabou the same length around the soft hackle for tail. Tie on a piece of wire about 4 or 5 inch long, if no thread tag's been used. Now tie on the grizzly bugger hackle tip first to get a slight taper. Finally tie on a piece of  medium & long black ostrich herl for the body.

3- After all the materials is secure, bind down all loose material while bringing thread back to the collar area about 2 to 3 mm behind hook eye. The first material to be wounded is the ostrich herl & tie off at the collar area. The next material is the grizzly bugger hackle palmered around ostrich herl. dull side faces the rear. about 5 to 7 turns & tie off. The last thing is the medium wire or tying thread wound over the hackle & tie off at collar.

4- After everything is secure at collar, use a piece of velcro gently brush hackle & ostrich herl together and toward the tail. Dub some peacock or ice dub on tying thread and make a small collar covering tie off points.
Use velcro brush loose some ice dud to blend with hackle. Finally use tying thread to wrap a small & neat head & whip finish. Put on 2 coats of head cement and the zoolly is complete.! 


5- For the Blood shot zoolly, the collar materials must be mix with some peacock & red ice dub or red synthetic materials to achieved the blood shot effect over body.

Blood Shot Zoolly


Wednesday 8 August 2012

The Parachute Mosquito Larvae & Nymph (PML).

Parachute Mosquito Larvae ( Dry )
PML ( Dry )

  This is another one of my new fly creation and I call it the Parachute Mosquito Larvae or PML for short. The idea of this fly came from watching mosquito videos like the mosquito's life cycle on you-tube and other mosquito related photos on Google image. This fly is something in between a dry fly & a nymph and the larvae stage of the mosquito is excellent for this kind of pattern. The parachute on this fly is a little different than the regular parachute dry fly people are use to, because there's that small gap between the mosquito larva's body and the water surface above. The hackle has to be tie a bit higher from the body, so that the nymph's body can sit a bit deeper below the water surface. It's the hardest part of tying this particular fly. But it can be done with a little bit of practises or it can also be done by using 2 vise and make the parachute part ahead of time and the rest of this fly pattern is pretty simple. I also tie the same fly without the parachute just for fun and to see which fly pattern is more effective on trout when fish. I'll list the materials and tying steps below for anyone who's interested in trying out a different type of fly pattern like the parachute mosquito larvae.!

Mosquito Larvae Tenkara Style.

  Materials needed for this fly pattern.
  • Hook- dry or nymph size 14 to 20
  • Body- .5 mm clear stretch cord
  • Under-body- tying thread 
  • Whiskers- soft hackles or schlappen
  • Eyes- burn mono & black marker
  • Thorax- hares mask dubbing
  • Parachute- antron post & dry fly hackle
  • Tying thread- uni 8/0 or thinner
  • Head cement
  
Mosquito Larvae Nymph.
   Parachute mosquito larvae tying steps.                

1- Start thread behind hook eye & tie in hackle post using half of a full strand of regular antron post material & leave out a few antron fibres on the side for breathers. 

2- Continue thread down the hook shank to just past hook bend and tie in mono eyes with some figure 8 wraps. 

Mosquito Larvae Nymph.
3- Using 10 to 15 soft hackle fibres and tie it in front of mono eyes, dub tying thread with some hares mask dubbing & figure 8 dubbing thread around  mono eyes. Using the soft hackle fibres to cover the top side of mono eyes to make a mosquito larvae head. ( see PML 2 )

4- Tie in a piece of .5 mm clear stretch and dub just a bit behind mono eyes to cover thread wraps, bring thread back to hackle post area in touching turns. Start ribbing body with the clear stretch in touching turns and tie off ribbing material at the base of hackle post.

5- Tie in dry fly hackle a few mm above fly body on the antron post and leave tying thread on the top side of hackle post, start wrapping the hackle up the antron post to where the tying thread is and tie off hackle.        (The hackle can be tie on to antron post before everything else)optional.

6- Add a drop of head cement to the base of hackle post and the hackle tie off point. The fly is complete.!

  More PML photos below.
Parachute Mosquito Larvae.( Black )

Parachute Mosquito Larvae. ( Green )

Parachute Mosquito Larvae. ( Yellow & Black )


Mosquito Larvae Nymph.


Tuesday 7 August 2012

My Caddis Dry Fly.

My caddis. golden olive 
My Caddis top view.

  This is my new semi realistic adult caddis dry fly pattern. The idea came about when I was trying to create a caddis pattern that doesn't need any dry fly hackle around the collar and still floats just as good or even better, So my only go to options was a fly foam body & substitute the dry fly hackle with cdc feathers ( cul de canard ). The fly in the photo was the result of my first successful tie of this new hackle-less caddis pattern. It was supposed to be called a "Tape Wing Extended Body CDC Caddis" but the name was way too long and it sounds more like a fly description instead of a fly name, so I just called it "My Caddis". This pattern is pretty easy to tie, but there's a few things that is needed to be made ahead of time, like the scotch tape caddis wings, the segmented fly foam body & the small burned mono eyes. It's better to colour the wings & extended body before hand and let it dry completely before tying it onto the hook and the only materials remain are micro-fibbets, cdc feathers & a small amount of mix rabbit & antron dubbing. I will list the materials and tying steps in order for anyone who would like to try it out.!

My caddis. brown
My caddis. silver & gray

      Tying Steps

 1- Start thread & tie in 2 pcs of micro fibbets around 1 or 2 mm. behind hook eye.

 2- Tie in mono eyes on top of the antennae tie in point with a few figure 8 wraps & continue thread to hook barb.

 3- Tie in pre-made extended body by the hook barb, #'s of segments depend on hook size. The front of the extended body should reach the thorax area or 1 to 3 mm behind mono eyes.

 4- After body is secure, make a slit in the middle of the tying thread or make a dubbing loop & insert cdc fibres to make a string cdc hackle and wrap it around thorax area & tie off. #'s of hackle wraps depend on the cdc string hackle length and quality.

 5- Tie in scotch tape caddis wing & add a Little bit of mix dubbing to cover thread wraps and do a single figure 8 wraps around mono eyes & whip finish, add a drop of head cement & the hackle-less dry fly caddis is complete.!

My caddis brown.
 Materials

Hook- dry fly size 12 to 18
Body- 2 mm. fly foam. ( burn butt end ) optional.
Wings- scotch tape ( reinforce with packing or sealing tape ) optional.
Legs- cdc feather fibres
Thorax- mix rabbit & antron dubbing
Eyes- heavy mono fishing line 15 or 20 lbs, burn both ends.
Antennae- micro-fibbets
Thread- uni 8/0 or 6/0


Saturday 7 July 2012

The marabou tube flies

The blood sucking tube.

Red & White  

Silver Doctor Blues
   These are some of the marabou tube flies that I tied and took photos of awhile ago. They were made for fishing the Niagara falls steelheads, but I still haven't had a chance to use them for that particular purpose and hope to get a chance to use them before the summer is over. Even though the Niagara falls steelheads is open all year round, but fishing in the winter is really hard on the hands and fingers, especially trekking through the snowy slippery trails in the Niagara forest areas and the steep mountain slopes is tremendously dangerous. But the idea of big steelheads waiting for me down the river is really tempting and the cravings of catching fish out weigh some of the dangers. I made a similar trip with a fishing buddy to the Niagara river for steelhead last year. We were using conventional spin rod settings and artificial lures like X-rap, Live targets minnows, Mepp #3 spinners, but we didn't catch anything. I know that there's got to be fish in the river, because I saw a few fisherman caught some small ones, maybe 2 or 3 pounds steelhead or rainbows. They were using rows of salmon eggs and drifting them under a slip float rig on a fly rod. Maybe real salmon eggs is better than the artificial lures when it comes to targeting steelheads. I will go again to challenge the Niagara river steelheads and will be better prepare & equip with the proper gears and baits. I really hope that some of the nymphs and tube flies that I tied will work and fool some of the big steelheads into taking my flies.! OK. Lets get back to the tube fly, it's a really simple pattern to tie. The whole fly is consist of palmer marabou & soft webby hackles like large hen feathers or schlappen on a plastic tube. I'll list the material below for anyone who wants to try it out, remember that all the material & colours can change and mix around for a different kind of looks that will fit your own personal taste.!!!  
     
White & Chartreuse


        Material list

  • Tubes- HMH, Pro tubes or any kind of tube size 1/8 or smaller. soft or hard
  • Body- white marabou, mylar
  • Head- schlappen, hen, mallard
  • Krystal Flash- pearl, silver, gold
  • Thread- Uni 6/0 or 3/0
  • Note: leave space for junction tube.